CopiaFacts Install Manager 
COPIAINSTALL9
This program manages download installations from the Copia CloudFront CDN site. It presents a menu of installation tasks.
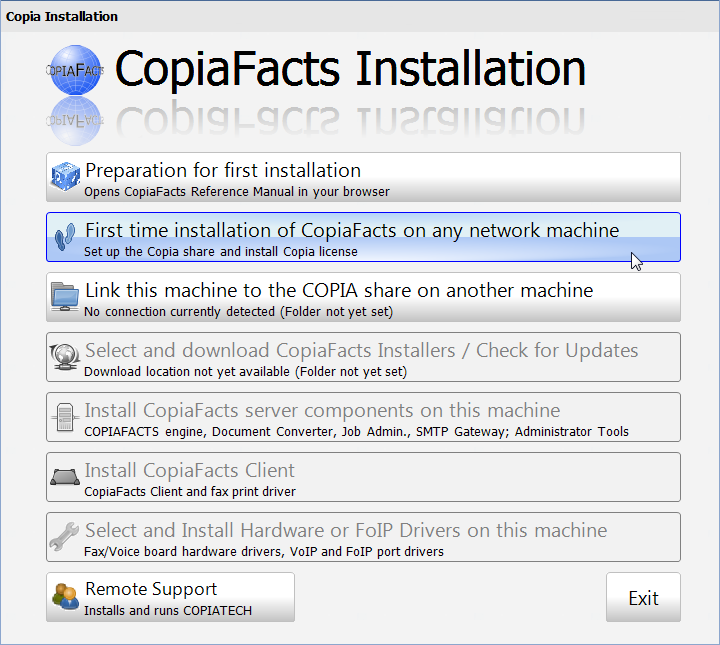
Preparation
 | In this topic, we use 'machine' for either a physical or a virtual machine. |
Clicking this button takes you to the Installation Notes topic of this manual. Please read this first.
If you wish to use a separate machine as the file server on which the COPIA share will reside, COPIAINSTALL9 will ask you to visit that machine (as adminstrator) to create the COPIA share first, with suitable permission for use by CopiaFacts server(s) and (if used) CopiaFacts clients.
If your file server cannot run Windows applications, the COPIA share will need to be created there manually using the facilities of your installed file-system there.
Initial Download
Start by downloading this COPIAINSTALL9 program from http://cdn.copia.com/files9/COPIAINSTALL9.exe. Note that all cdn.copia.com links are case-sensitive. You can save it temporarily on the desktop or in a temporary folder: the server installer will place a copy in Program Files\Copia in case you need to use it for further downloading later.
First Time Installation
This button allows you to create a COPIA folder and share it for access by any machine on which Copia applications are to be installed. It sets up a CopiaFacts Application Data area and then allows you to install a license from the COPIA_xxxx.ZIP file (xxxx is your serial number) which will have been sent to your along with the download instructions for this program. If you do not have a license ZIP file you can continue in evaluation mode.
After you have installed a COPIA share and the CopiaFacts Application Data area, the legend on this button will change to allow relocation of this share to another machine if necessary.
Link this machine ...
This button prepares the machine on which you are running the program to link to the COPIA share and the CopiaFacts Application Data area on another machine. This step must be performed before you can run Copia applications on the machine.
Download / Check for Updates
This button connects to the Copia CloudFront site to list the files9/NETBIN folder, where CopiaFacts installers are located. You may need to permit this http connection in your firewall. The available installers (xxx below indicates the build number) are:
•CopiaServerInstall91xxxx.exe installs CopiaFacts Server components, such as COPIAFACTS, Document Converter, SMTP Gateway, etc.
•CopiaClientInstall91xxxx.exe installs CopiaFacts desktop client components, viewer, status viewer etc.
•Installhardware_xxx.exe installs a hardware or IP-port driver. There is no need to download all of these, only the one(s) for which you have the corresponding hardware or ports.
The installers will be downloaded to the NETBIN folder in your COPIA share. You can run the installer directly from there if you wish to install on multiple machines, or use COPIAINSTALL9 on another machine to run it from there. There is no need to perform this operation to download it onto other machines, because the program will always download the installers to the COPIA share.
In each case the installer filename will be followed by the four-digit version number of the principal component contained in the installer.
Release-candidate builds of the installers will have a _PW suffix on the filename, and will require a password. Ignore these builds unless you have been advised to use them by Copia support.
Install ... on this machine
These two buttons will run the latest version of the corresponding installer. The installers are run from your COPIA\NETBIN folder to which they will have been downloaded. The button will always display the installer with the highest version number if more than one version of the installer is present in the NETBIN folder. To install or re-install an earlier release, navigate to the NETBIN folder in Explorer and select and run manually the installer you require.
The Server Installer starts with a dialog to select the components you require to install:
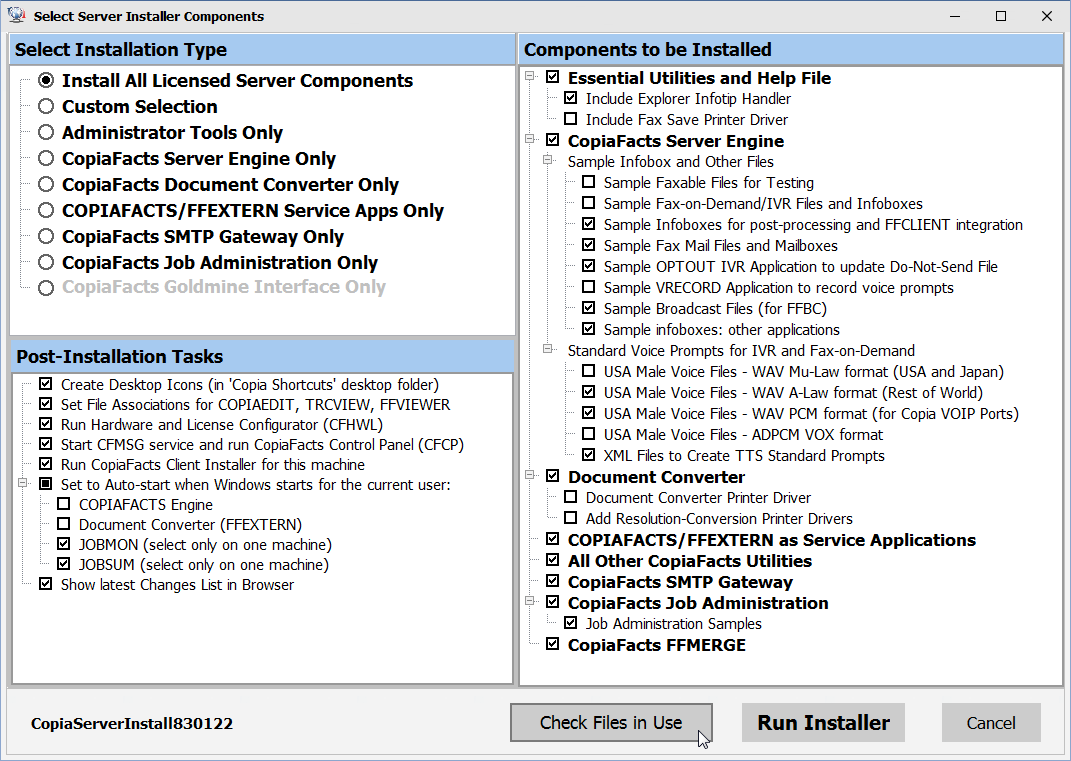
It is important to check for files in use before you continue to run the installer. If you close down, or allow the installer to close down, active applications, you may avoid the need for a reboot.
Installing Hardware and IP-Port Drivers
Hardware and FoIP drivers can be selected and installed by the final full-width button. However some voice and fax hardware supported by CopiaFacts is known to Windows and drivers will be installed automatically when you install the board; or you may have drivers installed already.
The dialog will display the drivers appropriate for your system, if you have already downloaded them. The version numbers in the screen shot below will be the latest version you have downloaded.
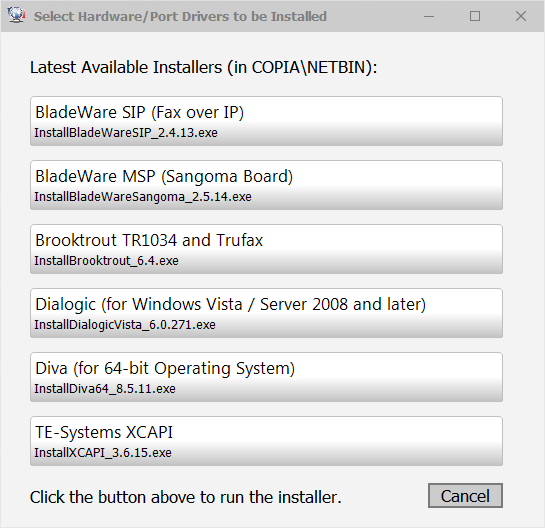
The appropriate installer will be run when you click the button. Do not download or attempt to install drivers for hardware which you do not have installed.
You should normally follow advice from the installer about re-booting your machine before starting Copia applications which use the drivers. However for BladeWare installs we recommend not rebooting the machine until you have completed the configuration.