The following keywords can be used in a set of image options. The options affect only the built-in document converters for PDF, HTML, JPG, GIF, PNG, and color or gray-scale TIF documents. When you use built-in converters for Office documents, which first save the document as PDF, then the options described below for PDFs also apply to these Office documents.
 | These image rendering options do not affect conversions which use the CopiaFacts Document Converter print drivers, where the rendering can be adjusted only in the Windows printer properties dialog. |
Options fall into five groups:
•Management of option sets: in this group are options to name the set, to lock it, and to configure the automatic substitution of one set by another if the conversion of a 'problem' document to TIF format produces an oversized file.
•Document sizing: controls size of color bitmap into which the original document is initially rendered or converted before processing and compression into fax encoding.
•Renderer selection: for PDF and HTML originals, selects the renderer to be used. For PDF, we use either a custom renderer (always used for on-the-fly conversion in COPIAFACTS), or the public-domain PDFium renderer (the default for Document Converter). For HTML the choice is between Windows GDI (default) and GDIPlus.
•Output Formatting: controls output TIF resolution (normal, low) and compression.
•Image Correction and Transformation: These options perform the manipulation, adjustment and correction of the color bitmap. The goals are to maximize the quality of the received fax document and to minimize transmission time. For some documents, both cannot be achieved at the same time. After this processing, the image is converted to monochrome and compressed using fax encoding.
Management of Option Sets
| <comment> | a comment string in angle-brackets may optionally be included in the set of options. This can be used as a reminder of the purpose of the option set and is visible while editing the options in the Image Options Editor. |
| TRYn/s | Specifies an alternate option set to be tried if the size of the fax-compressed page exceeds a specified size. The n parameter specifies the image option set number, from 0 to 9, and the s parameter specifies the size threshold in kilobytes. For more details see Trying Multiple Image Option Sets. |
| | We recommend that this option is used only on the default or initially selected image option set. We also suggest that you should use low-numbered option sets for those with TRY keywords, and define option sets with higher numbers for selection as alternates. |
| LOCKED | Allows optional locking of an option set to avoid accidental overriding with an IMAGE_OPTION variable. |
Document size options
These options affect the initial conversion steps and so are not overridden when you TRY multiple option sets. They are only used on the first or only option set selected for a conversion.
| SCALE | Scales the document to the full width of a standard fax page (1728, 2046 or 2432 pixels at 204dpi). This affects standard document sizes smaller than a standard fax width (A4, A5L, A3, B4ISO). This option will also make the resulting fax longer than a standard page. This option is also useful when a Powerpoint slide size is smaller than a normal page. If you are using the Original renderer, this option should not be used if your document contains a mix of portrait and landscape pages. |
| SCIMG | For image (JPG, GIF, PNG, non-faxable TIF) conversions only, scales the image to full page in proportion to the image dimensions. The page size used is as specified by keyword PAGESIZE below. This option is applied automatically for images where the pixel dimensions exceed the selected fax page size. |
| PAGESIZEn | Selects the page size for rendering HTML and Image documents. The value n is the Windows page-size number, for example Letter (1), A4 (9). The Image Options Editor in FFVIEWER allows this to be selected from a menu of supported page sizes. A letter L is appended if the document is to be rendered in landscape mode. Landscape mode documents (other than A5 and B5 sizes) are rotated automatically for faxing. This setting does not override specific page dimensions embedded in the HTML document. |
| B4A4 | Scales a B4 document to produce A4 output. This option also implies the SCALE keyword. |
| A3A4 | Scales an A3 document to produce A4 output. This option also implies the SCALE keyword. |
| ANTI | Rotates landscape pages anti-clockwise: the default is clockwise. |
| MARGINSt/r/b/l | Selects margin settings for rendering HTML documents. The values are the top, right, bottom and left margins and override margins specified for the document in the HTML document. MARGINS0/0/0/0 suppresses all margins. Note that the four values are specified clockwise from the top (as in the margins= HTML attribute), not as in the $web_margins command which applies to conversions using Internet Explorer and the print driver. |
| DPIn | For HTML conversions of documents which may contain pixel measurements (px), specifies the screen resolution for which the pixels were intended. The default is 96, corresponding to the Windows 'standard' text size. |
Renderer Selection
| ORIG | For PDF conversions, uses the original renderer in use before release 8.3 instead of the default PDFium renderer. The original renderer is still used if the correct CFPDFIUM.DLL file is not present in the COPIA program files sub-folder or if the PDFium rendering fails. PDFium creates slightly higher quality and smaller output and is the basis of Google's PDF handling in the Chrome browser, so can be expected to perform well with a wide range of documents, though it does not support a few rarely-encountered PDF features such as embedded attachment files. |
| GDIPLUS | From 8.3.1.264 this option is ignored. For HTML conversions, GDI Plus is used instead of the default GDI to render the HTML. Although operating systems which do not support GDI Plus are now infrequently encountered, GDI still benchmarks considerably faster than GDI Plus, especially when rendering text. However GDI Plus can handle some complex graphics rendering which GDI cannot. |
Output formatting options
These options are not overridden when you TRY multiple option sets, because they would invalidate the size comparisons. They are only used on the first or only option set selected for a conversion.
| These Resolution and Compression options are also not overridden if already defined for the option set in FAXFACTS.CFG and then unchecked in the Image Options Editor without first updating the configuration file. |
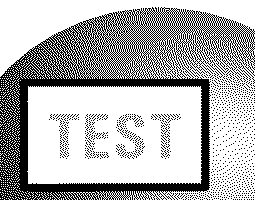
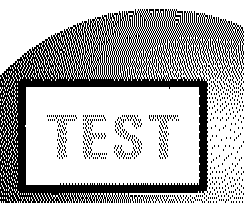
Low-resolution fax transmission involves sending only half the number of horizontal 'scan lines', and doubling them at the receiving end. CopiaFacts supports two ways of doing this:
ORIGINAL
|
High Res. (size 1.0)
|
LOWRES (size 0.6)
|
LOWRESMS (size 0.4)
|

|
|
|

|
| LOWRES | Processes the scan lines of the color or grayscale bitmap in pairs, creating a single line of black or white pixels. This provides the highest quality for graphics and gray-scale images because it provides smooth gradation of an area of color. |
| LOWRESMS | Processes the scan lines of the color or grayscale bitmap individually, then merges the black pixels of each pair of lines. This is the traditional method and produces an adequate result for normal size text, but graphics rendering will be lower quality and small size text may appear bolder and less legible. This method can produce a much smaller file size but should only be used if low transmission time is more important to you than legibility of the result, and few of your original documents contain color or grayscale regions. |
There is no longer much reason to use other than the default MMR compression (also known, inaccurately, as Group 4) unless you are using a fax board which does not support it, such as some TruFax boards. Changing the compression option (MH, MR,MMR) does not affect image quality.
| FAXMH, FAXMR | Creates the TIF file with MH (aka Group3) or MR (aka Group2 2D) compression. The default is MMR. |
Image Correction and Transformation
| HEIGHTn | Scales the output image vertically to a scan row height of n (measured in high-res scan lines, even for low-res output). If n is omitted, the image is scaled to the same height as the input page, to the next multiple of 16 pixels. For HTML document conversions, where there is typically no 'input document height', a HEIGHT keyword without a specific height is ignored. For A4 input, use 2292 to make the resulting TIF the height of an A4 page (297mm at 196dpi); for US Letter input, use 2156 to make the resulting TIF the height of a letter page (11" at 196dpi). This option is applied independently of the scaling options above which affect only the creation of an intermediate PDF file. The aspect ratio of the original document may not be preserved at the receiving end. |
| SHARPENn | Applies a sharpening algorithm to the whole image. The value n (from 1 to 100) selects the strength of the algorithm. |
| EDGE | Applies an algorithm to make solid areas more uniform and enhance edges. This will usually produce better results, especially with text, than the SHARPEN algorithm but may take slightly longer to apply. |
| CONTRASTr/s | Applies an optional automatic contrast adjustment to PDF, HTML, JPG, GIF, PNG and non-faxable TIF documents, based on a gray-scale histogram. This transformation is intended for pictures of documents, and may somewhat degrade the rendering of full-color photographs. |
| | There are two contrast parameters, but the defaults cover most cases. The first parameter defines the range of brightness to be adjusted: it specifies the percentage of the intensity range to be excluded at the top and bottom. So the default value of 1 causes pixels with intensities in the range 1% to 99% between black and white to be adjusted. The outliers are set to black and white respectively. The second parameter affects the amount by which the intensity is stretched up for light colors and down for dark. It defaults to 1.0 and can be increased in steps of 0.1 to affect the amount by which the intensity is adjusted. The parameter maximum values are 10 and 5.0 respectively; values outside the range are set to the default. When used, this transformation causes the remaining transformations to operate on a gray-scale image, and for PDF output an original color image is converted to gray-scale; to retain color images, use a negative value for stretch factor. |
| | If the r and s parameters are omitted, the keyword is taken as CONTRAST1/1.0. |
| BRIGHTNESSn | Increases (positive values of n) or decreases (negative values of n) the brightness (whiteness) of the image. The value n can range from -100 to 100. |
| GAMMAn | Increases logarithmically (values of n above 1.0) or decreases (values of n below 1.0) the brightness (whiteness) of the image. The value of n can range from 0.1 to 7.0. If your documents are likely to contain single-pixel or other very thin lines, we recommend darkening images slightly, using for example GAMMA0.8. |
| DESPECKLEnm | Despeckles the image. The value of n must be 3, 5 or 7 to specify the size in pixels of the surrounding square to be examined for each pixel, and the value of m must be 1, 2 or 3 to controls how aggressive the despeckling should be. The default is 52. Smaller values of m may be necessary if image elements are removed which should not be. Despeckling is done last, because some 'speckle' may be introduced by other operations. |
| DARKn | This option converts dark gray pixels to black. In some original documents, text or rules which appear black are actually very dark gray, and may appear speckled white after dithering. This option converts to black any pixels for which the R G and B color values are all less than n (where the range of n is 0..255). Using a negative value for n changes the check (using the absolute value of n) to be against the average of the R G and B values, so affects some dark colors in addition to grays. [Dither option 1 below is similar, but not identical, and is retained for compatibility]. |
| LIGHTn | This option converts light gray pixels to white. In some original documents, text or rules which appear white are actually very light gray, and may appear speckled black after dithering. This option converts to white any pixels for which the R G and B color values are all greater than n (where the range of n is 0..255). Using a negative value for n changes the check (using the absolute value of n) to be against the average of the R G and B values, so affects some light colors in addition to grays. |
| BGCOLORn | Using this option can change solid light-colored background colors on an image to white. Solid backgrounds can cause a huge increase in file size and transmission time after conversion to faxable TIF, and this option can typically achieve size reductions of up to 85% while retaining full legibility. The value n is a percentage: when this percentage, or more, of the non-white pixels on a page are a single color, all pixels of that color are forced to white. |
| | Darker colors are excluded; otherwise a page consisting of only dark-blue bold text might detect this as 100% of the non-white pixels and convert it to white. The default value of n is 20. This option is not effective with blocks of color gradient, for which the LIGHT option may be better. |
| CHECKBLACK | Inverts the image if the top and bottom few scan lines are predominantly black. |
Image dithering options (color or grayscale to monochrome) are used to convert the transformed image to a one-bit-per pixel monochrome fax format. For details of the algorithms, Google is the best resource. In practice there is seldom a reason to use other than the default, but if your fax documents make heavy use of graphic you may benefit from experimenting with others to improve either appearance or transmission time.
| DITHERn | Selects a specific dithering method (applied after Sharpen, Brightness or Gamma, and Edge processing), where n is a number as follows: |
| 1 | Nearest color matching without error correction. This just converts lighter colors to white and darker to black. |
| 4 | Simplified Floyd-Steinberg Error Diffusion dithering |
| 5 | True Floyd-Steinberg Error Diffusion dithering. This is the default. |
| 6 | Jarvis, Judice & Ninke Error Diffusion dithering |
| 7 | Stucki Error Diffusion dithering. |
| 8 | Burkes Error Diffusion dithering |
| 9 | Sierra-3 Error Diffusion dithering. |
| 10 | Sierra-2 Error Diffusion dithering. |
| 11 | Sierra-2-4A Error Diffusion dithering. |
| 12 | Atkinson HyperDither Error Diffusion dithering |
| | To use the original dithering algorithms from 8.1 and earlier CopiaFacts releases, use codes 81: nearest, 82: Floyd-Steinberg, 83: Stucki, 84: Sierra, 85: JJN, 86: S&A, 87: Burkes. These use different threshold values and result in noticeably reduced quality, but at the same time make for somewhat smaller file sizes. These dithering methods do not support dithering directly to low-resolution. |
| PHOTO1 | Optimized for color photograph content. Currently this setting selects Burkes Error Diffusion dithering. |
| MAP1 | Optimized for street maps with light-colored backgrounds and black text. Most backgrounds are converted to white without dithering, which significantly reduces the transmission time of the resulting TIF file. |
| PARM1=n | As a modifier for the MAP1 option, you may use a value of n to adjust the brightness above which light-colored backgrounds are converted to white. The range of n for this purpose is 0 to 255 and the default value is 224. |
| | Values of n above 256 are used to specify a single color to be converted to black. In this case the value is 256 plus the RGB value of the color to be changed. For example to change red (hexadecimal FF0000) to black, specify a value of 16711739 (hexadecimal FF0100). Each R,G,B item has a tolerance of 64. |
| PARM2=n | As a modifier for the MAP1 option, you may use a value of n to select the center of a brightness range which is to be forced to black output. The range of n is 0 to 765 and the range size is fixed at 65. This option is ignored if the image contains a large block of this brightness range, and also does not affect yellow/orange colors. The default is to treat no brightness range in this way. |
If you have a significant application which you think could benefit from a 'tweaked' conversion method, please contact Copia Support.
Note that the more image manipulation you do, and the more complex the image, the longer the conversion will take. However in most cases the image will be processed in only a couple of seconds per page.