SIP Traffic Monitor 
CFSIPMON [datafile]
CFSMSERVICE /install | /uninstall
net start|stop CFSMSERVICE
This feature allows monitoring of SIP traffic, either for FoIP or VoIP operations. It monitors traffic both to and from a specified single local IP address and port.
For full, detailed monitoring of all SIP traffic we recommend using Wireshark, but you should find that SIPMON is easier to use and will provide sufficient detail for many purposes. To install Wireshark, see the sub-topic Installing Wireshark.
The monitoring is done in the Service application CFSMSERVICE, and the SIPMON program is used to configure the service and view the saved data. However when the service is not installed the SIPMON program can be used to view raw SIP traffic, principally to check that the configuration has been set up correctly.
Initial Configuration
Before installing CFSMSERVICE as a service, run CFSIPMON to check that you can monitor SIP traffic.
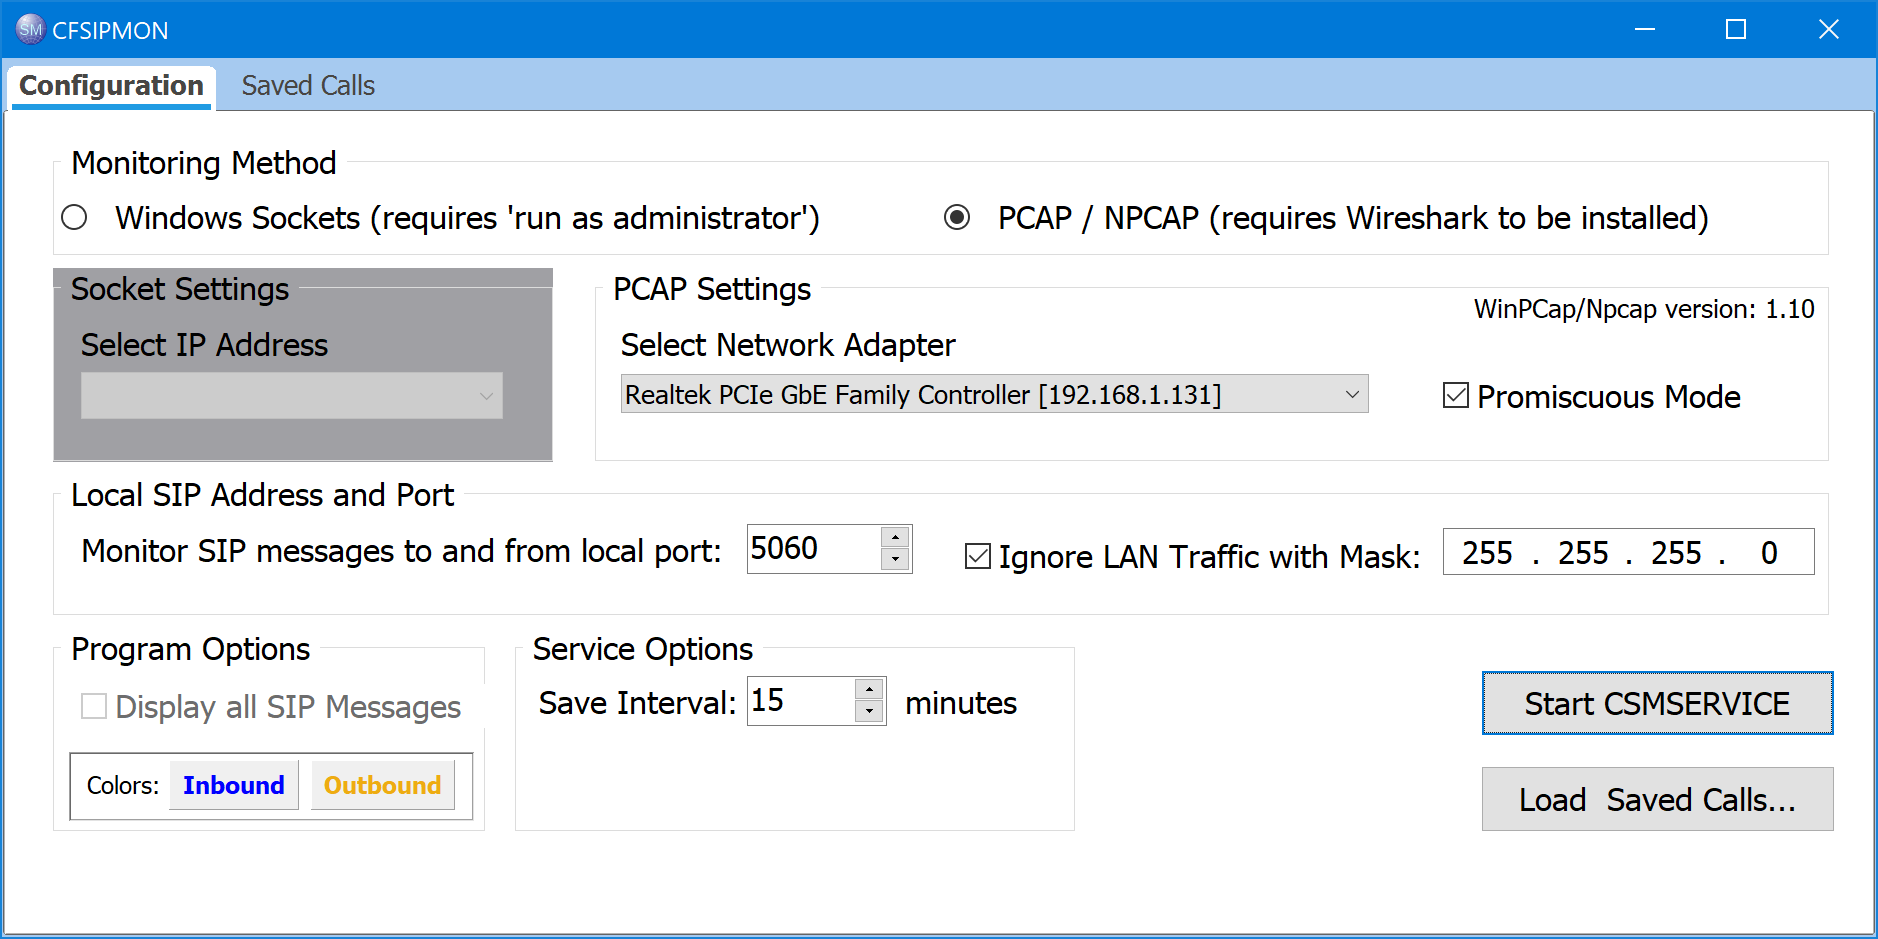
When the service is not installed, you can check 'Display all SIP messages' and then 'Start Monitoring'. This will display and open the raw SIP messages tab to display traffic. This feature allows you to check that you have configured the correct IP address and port. Note that you may see non-call SIP messages, such as REGISTER and OPTIONS, which will not appear in the call data.
Monitoring can be done in two ways: either by accessing the network interface card (NIC) directly, or by using the PCAP driver (installed by Wireshark) to do so. In some cases the NIC may not allow you to see traffic in both directions, but most modern interface cards will not have this problem. If you already have Wireshark installed, using PCAP may be more reliable, and can be done even if Wireshark is running, though this is not recommended. When using PCAP, you should normally select promiscuous mode.
For a machine with multiple adapters or an adapter with multiple ports, you must select the IP address or adapter port to be monitored, and also select the local port or ports to be monitored. Normally only a single local port is used for SIP messages. You should normally check the box to ignore intra-LAN traffic, unless you want to monitor a test from one machine to another within your network. The dialog for local port selection will show the ports in use, when available from the configuration settings.
After verifying that you can see relevant SIP traffic, close CFSIPMON and install CFSMSERVICE as a service.
Service Installation
To install CFSMSERVICE as a service, run it in an elevated command session with /install on the command-line:
CFSMSERVICE /install
You can either use the Services applet to set it to run automatically (default), or set it to manual start-up and use CFSIPMON to start and stop the service when needed. The command-line parameter /uninstall will uninstall the service.
CFSMSERVICE will write 330 bytes of data per SIP call or attempted call into a file named SIPMON_nnnn_yymmdd.DAT, where nnnn is the CopiaFacts node name. If the node name does not include the serial number, the serial number is also included. On a machine where the FAXFACTS folder is a local folder, the file is written in FAXFACTS\LOG folder, and if the FaxFacts Application Data area is not local the default temp folder will be used, as described for $local_temp.
 | On a busy machine large files may be generated for each day. We recommend using CFHK to remove the files you do not need. |
Service Configuration
Run CFSIPMON again to set additional configuration options. When CFSMSERVICE has been installed as a service, you can no longer use CFSIPMON for direct monitoring.
Adjust the Save Interval to a suitable value (default 15 minutes). The service will accumulate data in memory for this time, and loading the file to view in CFSIPMON will not show call records until they have been saved.
Currently the service must be stopped and restarted after making any changes. The file is saved when the service is stopped but data for active calls may be incomplete. When the service is started, no data is recorded for currently active calls; an INVITE starts the recording of a call's messages.
CFSIPMON Program Options
Select contrasting colors for Inbound and Outbound calls (default blue and orange respectively). These settings control both the main calls display and the pop-up display of a single call, where the Outbound color is used for messages where the INVITE is outbound and the Inbound color is used for messages where the INVITE is inbound.
Viewing Saved Calls
A file of saved calls can be loaded on demand; the Open dialog defaults to the folder used for saving on the machine, and if present the file with the current date. The Saved Calls tab is displayed after the file has been loaded.
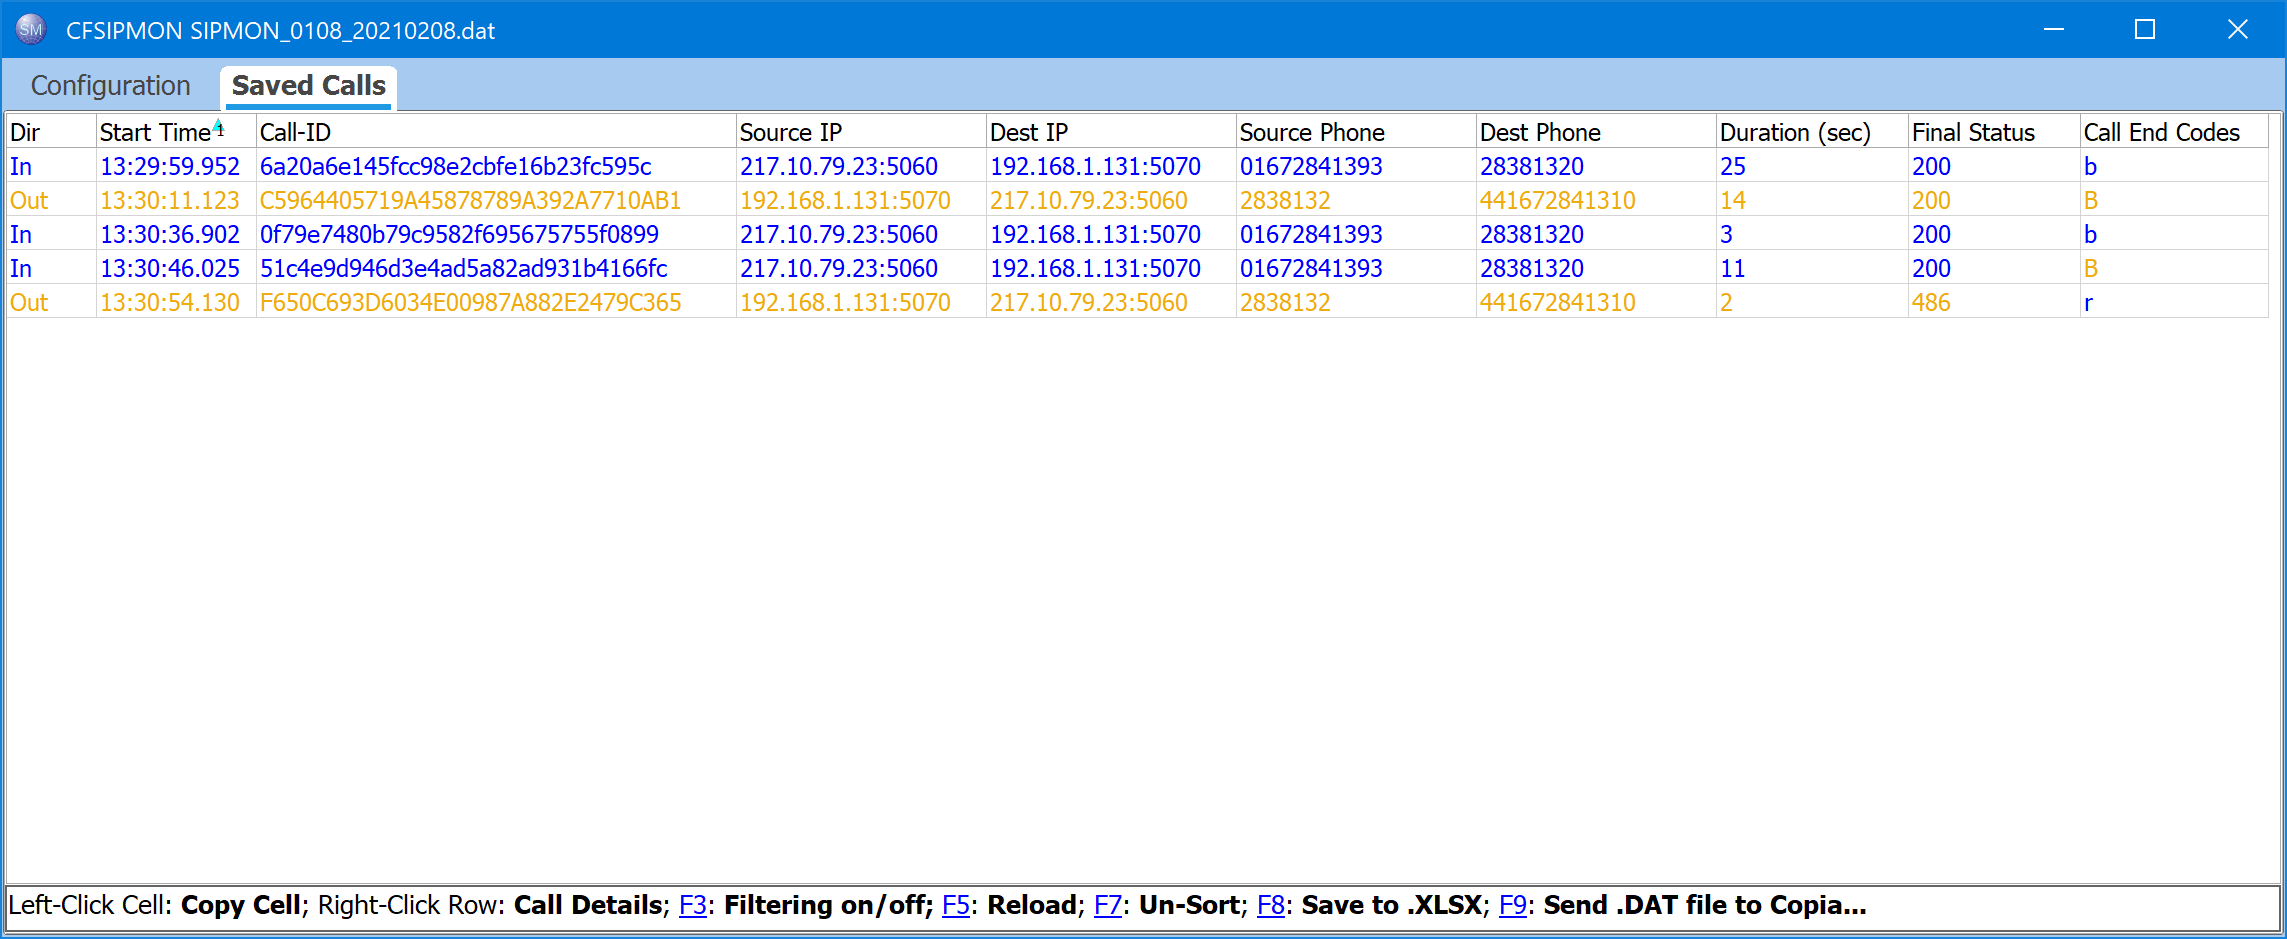
The status line at the foot of the screen shows the available operations. Function key names in blue may be clicked to perform the operation. F1 also opens this help topic.
Details of a single call can be shown by right-clicking a detail row in the display. The call display shows the time of the call and time of each SIP message in the call, along with the message or response type and the direction. No other data is saved by CFSMSERVICE and it is necessary to use Wireshark to view the full content of messages.
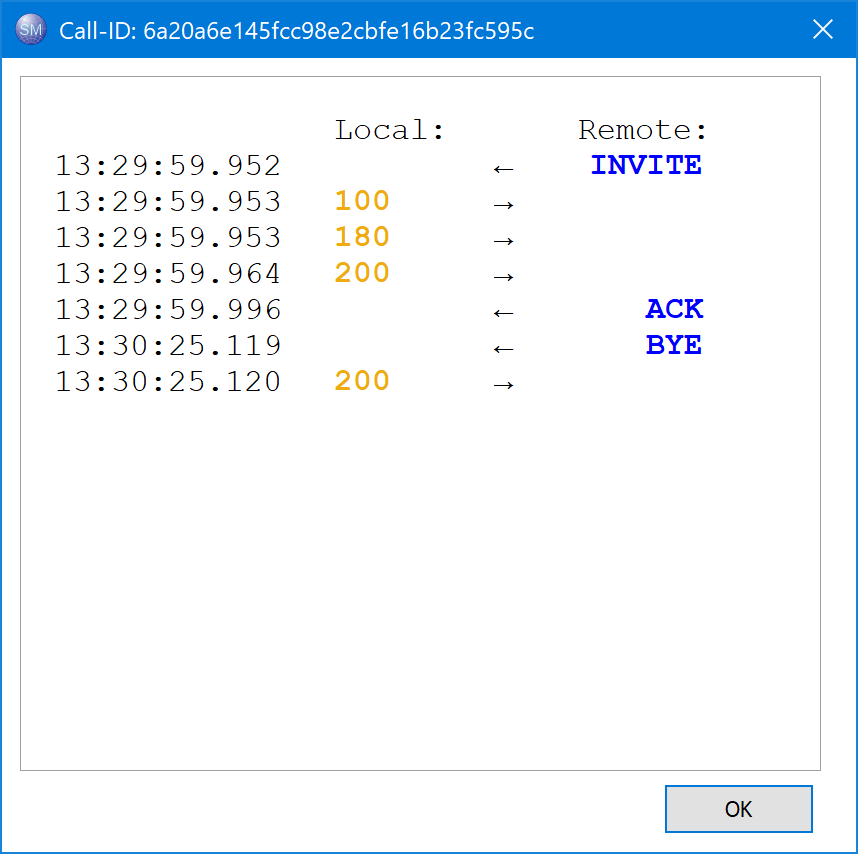
Note that only the first 16 monitored SIP commands are recorded for each call, together with the last message in the call. Most SIP transactions are completed well within this limit, and the restriction allows the size of the day's data file to be kept manageable. To be sure of seeing all commands, it is necessary to monitor calls with Wireshark. When more than 17 commands have been seen during the monitoring of the call, the total number of commands is shown in the Duration column as for example "(22 msg)".
Call End Codes
The Codes show how the call ended; lower case letters in the selected Inbound color indicate that the message was received, upper case in the outbound color means that the message was sent:
| B | a BYE message was sent or received |
| C | a CANCEL message was sent or received |
| R | a rejection code was sent or received |
| K | the call was still active when the service was stopped. |
Sorting Calls
To sort the list, click in a column heading to alternate between ascending and descending sequence. To restore the original sequence, press F7. You can shift click a column heading to add a sort key within the preceding sort. You will not be able to sort the list while the edit filters replace the column headings. The sort settings are persisted for the next use of CFSIPMON.
The saved data is loaded in the sequence it is saved, which is in order of call end time, but the default display sequence on first use of CFSIPMON is call start time. If you wish to not have the entries sorted on load, press F7 to Unsort before closing the program.
If you reload a file when it has been sorted, the sort is preserved on reload, and this becomes the basis for the next Unsort action.
Filtering and Searching Calls
Use F3 to toggle a row of filters to replace the column headings. Each filter defaults to 'Contains' so that entering a value in the filter box and pressing Enter will cause the display to be limited to calls which have the value in the column. The filter settings are not persisted for the next use of CFSIPMON.
Clicking on the icon in the filter box will display a menu of conditions for the filter; the original condition is 'contains'. This allows, for example, filtering on calls for which the duration was less than 2 seconds, or where the final status was not 200.
To remove all the filters and display the whole list, either clear each entered filter value or press F3 to clear filtering and display the whole list. F3 will not be actioned while you are editing a filter value, so press enter first if you are doing so. The current sort sequence is maintained while filters are active.
You can also search all columns for specified text: use F10 to display a search window at the foot of the grid.
Saving to XLSX
Use F8 to save the call data as viewed to an XLSX file for further analysis. The file is saved alongside the .DAT file, and has the same filename but with extension .XLSX.
Sending the .DAT file to Copia Support
Use F9 to open the dialog to send the .DAT file to Copia Support if needed for problem resolution. The .DAT file is preferred to an XLSX version because it includes the call detail items. When the Send dialog opens, other files may be added if requested by dragging them to the files box.