TE Systems provides the XCAPI interface for FoIP and VoIP. The interface and API is broadly similar to the Diva interface which has long been supported by CopiaFacts.
 | If you are converting to use XCAPI from another CopiaFacts supported board or port type, you will need to change or add interface-specific variables and environment variables. Guidance can be found at the foot of this topic. |
Features currently not supported by the CopiaFacts Interface for TE systems include:
•VOX files. Use WAV files instead - any of the formats listed for Diva boards are supported. To convert custom voice prompts in VOX format, if you have any, we recommend the free SOX utility, for which we provide details and a link in Appendix K.
•Beep Tone Generation. Use SVP10 to provide a 'speak after the beep' tone.
•Tone detection other than DTMF tones.
•Answering machine detection
•300x300 and 400x400 fax resolutions
The TE Systems base license covers voice functions and has a fax option. Currently the CopiaFacts CFHWL license manager assumes that if you configure fax channels, you have sufficient XCAPI fax licenses for all channels: if not, calls may fail.
Introduction
TE Systems provides a series of tutorial Videos which cover installing and using XCAPI. We recommend watching some of these if you are new to the product.
We recommend that you run COPIAFACTS with Debug Configuration and Startup set on the Options/Debug tab. This will report your XCAPI license status in the engine trace file at the start of each session. There is also an XCAPI license item in the automatic trigger notifications dialog in EMSETUP, which can notify an administrator in advance of license or XCAPI software update service expiration.
| When upgrading your XCAPI software, make sure that your XCAPI Software Update Service expiration date is later than the release date of the version you plan to update to. The release dates of recent XCAPI software releases are: |
XCAPI.4.1.5 2025.02.03
XCAPI.4.1.4 2024.11.14
XCAPI 4.1.3 2024.10.30
XCAPI 4.1.2 2024.09.03
XCAPI 4.0.32 2023.11.30
XCAPI 4.0.31 2023.10.10
XCAPI 4.0.29 2022.12.20
XCAPI.4.0.26 2022.09.22
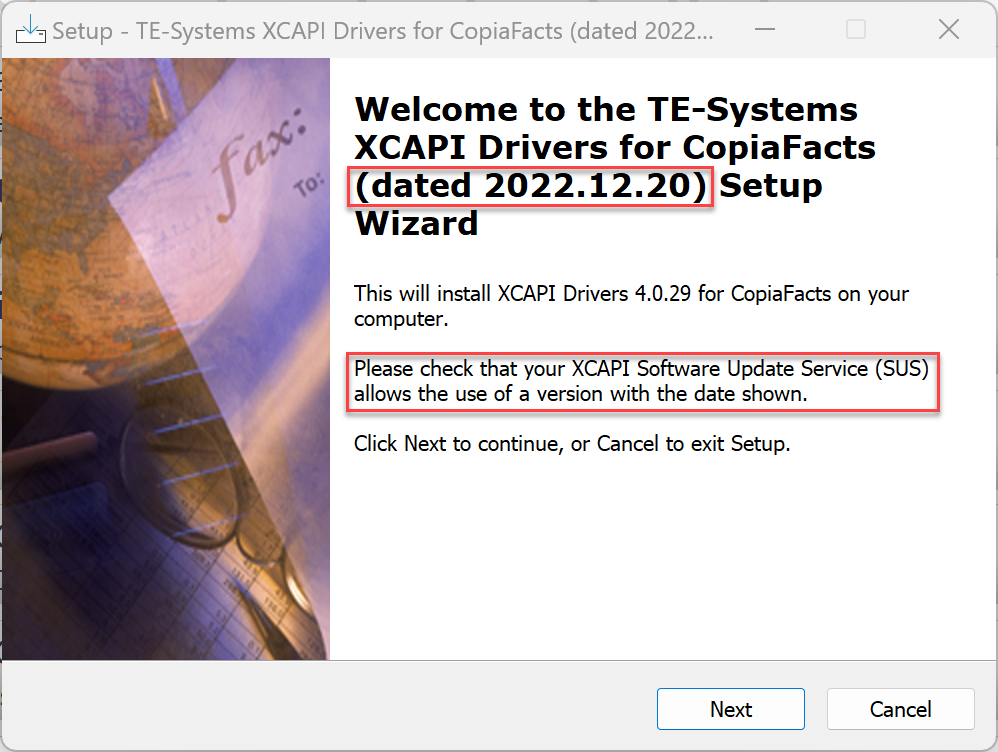
The date of the release is also shown in the CopiaFacts installer for XCAPI as in the first screen shot below.
| The drivers introduced in XCAPI 4.1 are not supported in CopiaFacts version 8 |
From COPIAINSTALL9, download InstallXCAPI_x.x.xx.exe and then click the Select and Install Hardware/Drivers button and pick this installer to run. This will run the TE-Systems Installer for you, which will then (on a new install) offer to run the XCAPI Configuration program.
| If you are upgrading XCAPI, make sure that your XCAPI SUS expiry date is not before the software release date, otherwise your license will revert to an evaluation license and may display a watermark on each page: |
| We recommend setting a Notification Trigger (in EMSETUP) to send you an e-mail prior to the expiration of XCAPI licenses or Software Upgrade Service (XCAPI SUS). |
TE-Systems provide pre-defined configuration parameters for a wide range of SIP providers and in-house telephony switches. In most cases you will be able to configure at least the basic options by adding the appropriate provider or switch from the Controller / New menu in the XCAPI configuration program.
| Before starting CopiaFacts, please run the XCAPI Xtest program from the Start Menu XCAPI section and check that you can place calls to and receive calls from your chosen SIP provider or switch. |
| VMware Virtual Machines: if you are running TE-Systems XCAPI in a VMware Virtual Machine, it is essential to read and act on the TE Systems technical note about this. You can find a copy of this at http://cdn.copia.com/files9/DOC/XCAPI_TechNote_VMware_Virtual_Machines.pdf. For VMware, the MAC address is normally fixed; do not change it manually after the XCAPI license has been installed. |
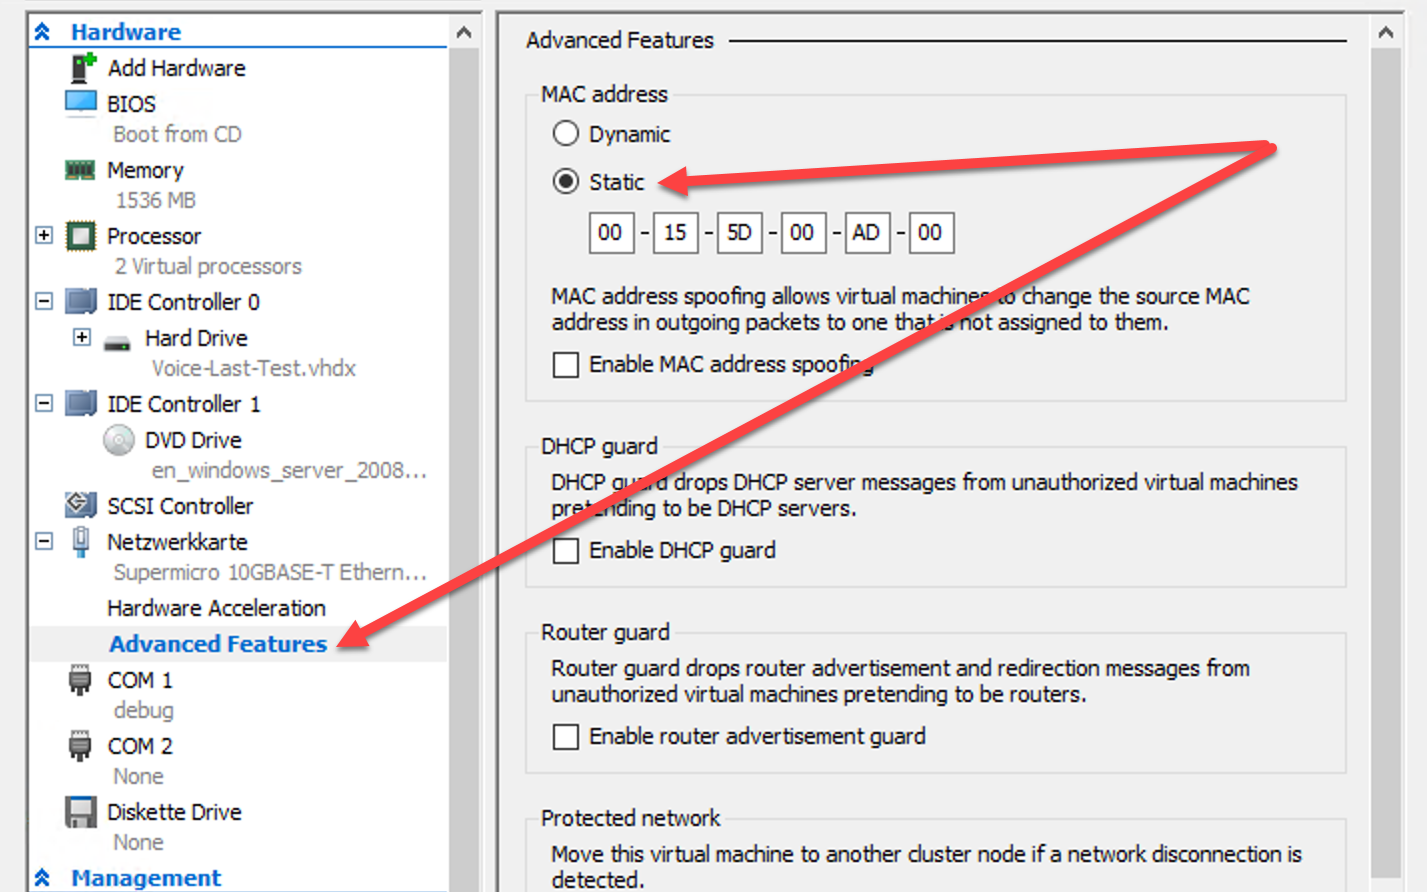
| Hyper-V Virtual Machines: if you are running TE-Systems XCAPI in a HyperV Virtual Machine, it is essential to read and act on the TE Systems technical note about this. You can find a copy of this at http://cdn.copia.com/files9/DOC/XCAPI_TechNote_Hyper-V_Virtual_Machines.pdf. In addition, you must ensure that the MAC address of the VM is set to static in the HyperV settings for the VM. This is done on the Advanced Features page under Network Adapter in the left panel: |
CopiaFacts will normally provide you with an XCAPI license key code from TE-Systems. You can choose whether to lock this to the NIC card or a calculated value on a physical machine.
If you are installing XCAPI on a Virtual Machine, first read the license installation notes at:
http://cdn.copia.com/files91/DOC/XCAPI_TechNote_Virtual_Hardware_ID.pdf
To install the license, find the XCAPI configurator in the list of All Programs or as an installed shortcut and run it to enter license details and configure XCAPI. Follow the steps in the XCAPI licensing wizard if you have an evaluation or full license to install:

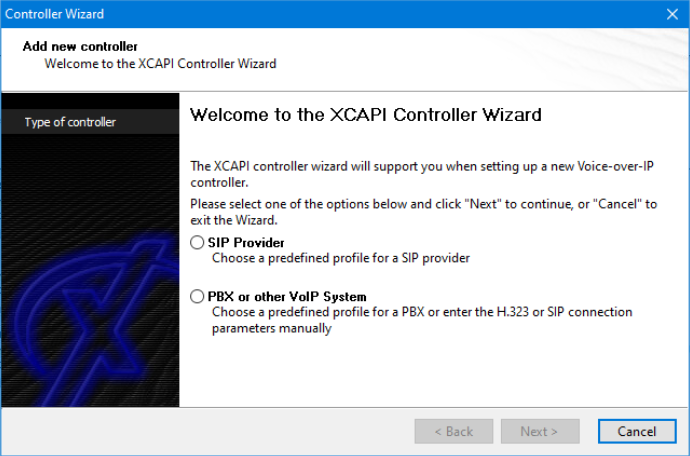
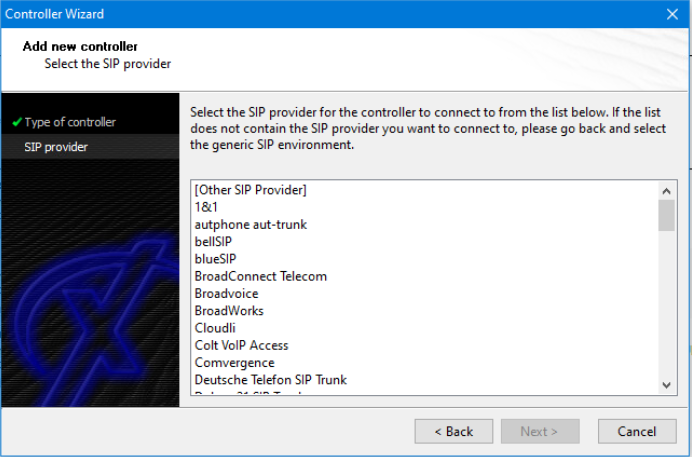
The following sample screens illustrate a configuration for Cloudli (formerly babyTel). On starting the configurator for the first time, it should show a list of supported SIP providers and PBX types; select 'other' if your provider is not in the list, and contact Copia support for further advice.
The remaining screens may differ slightly for different providers. If required, enter your user name and password:
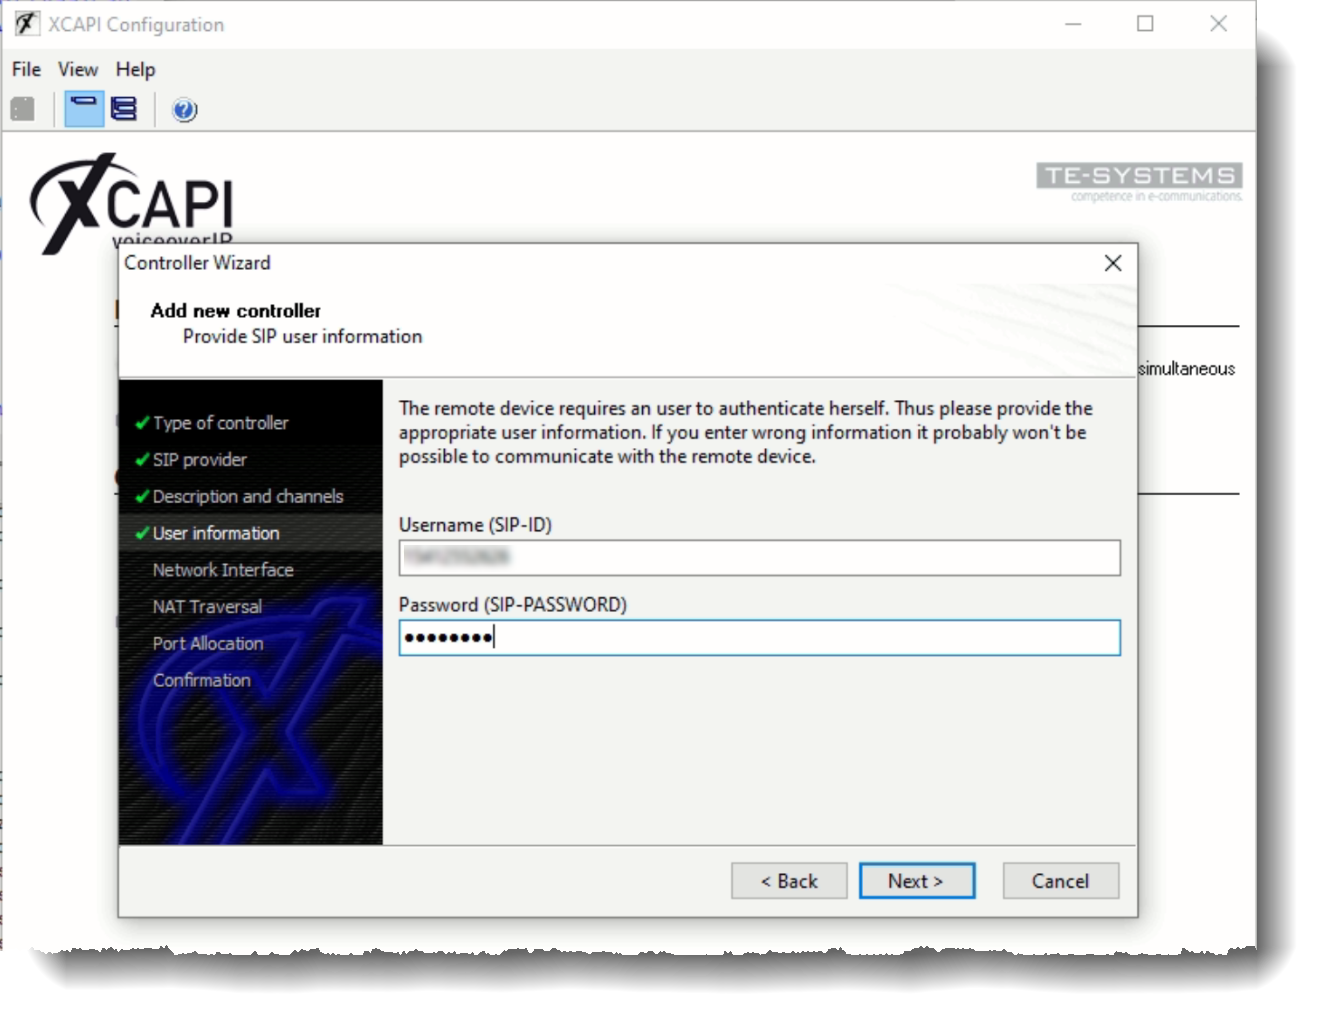
Next select the network interface to be used:
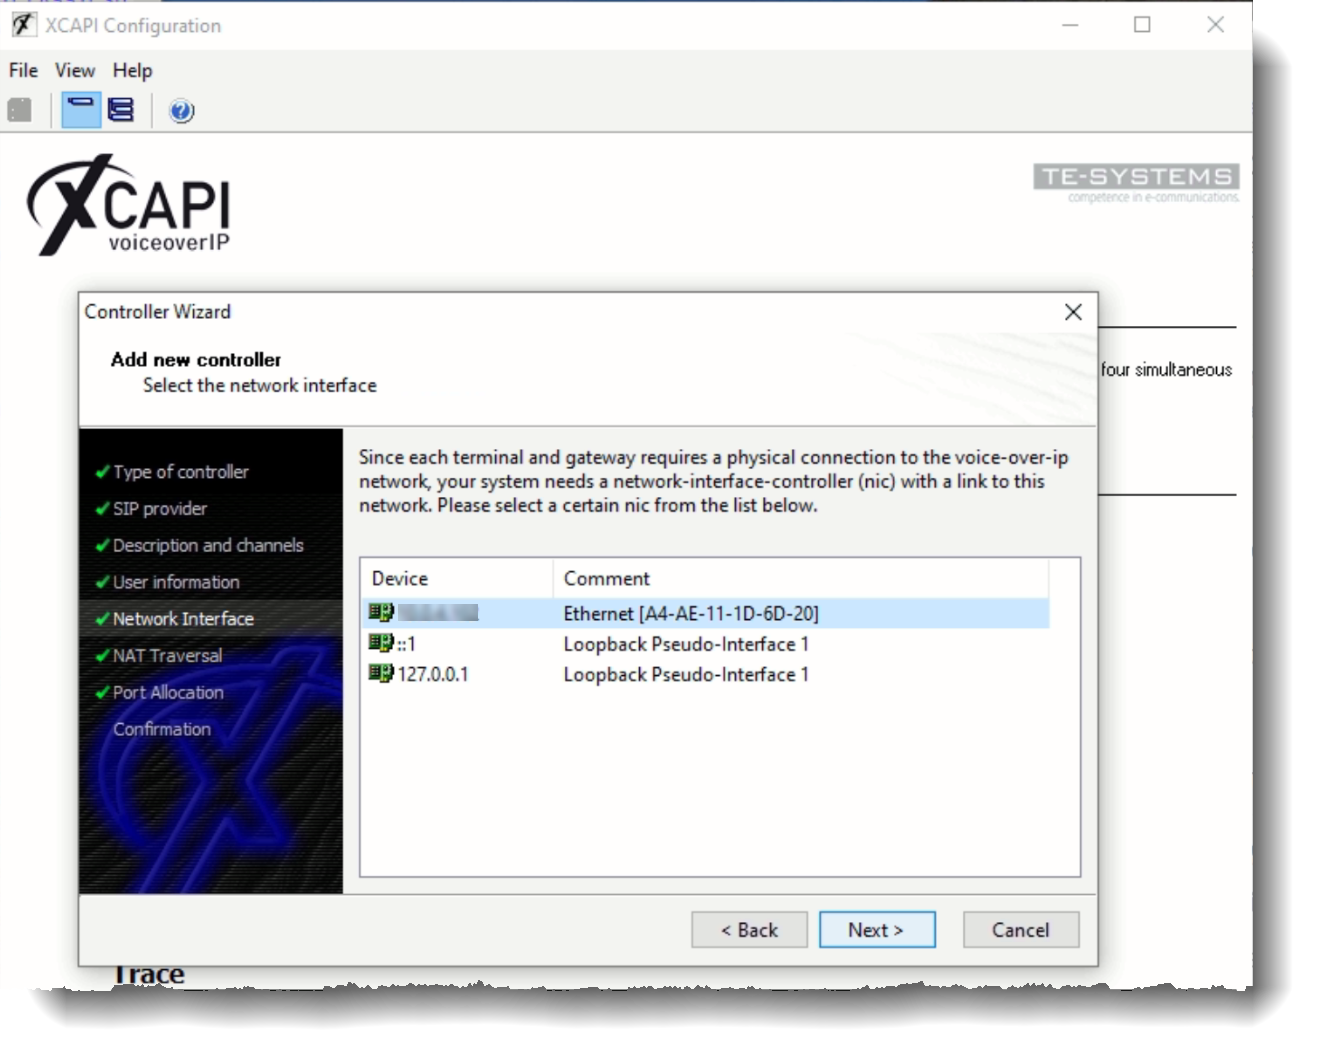
Enter either the public IP address of the machine, if to be used, or specify the NAT or STUN details:
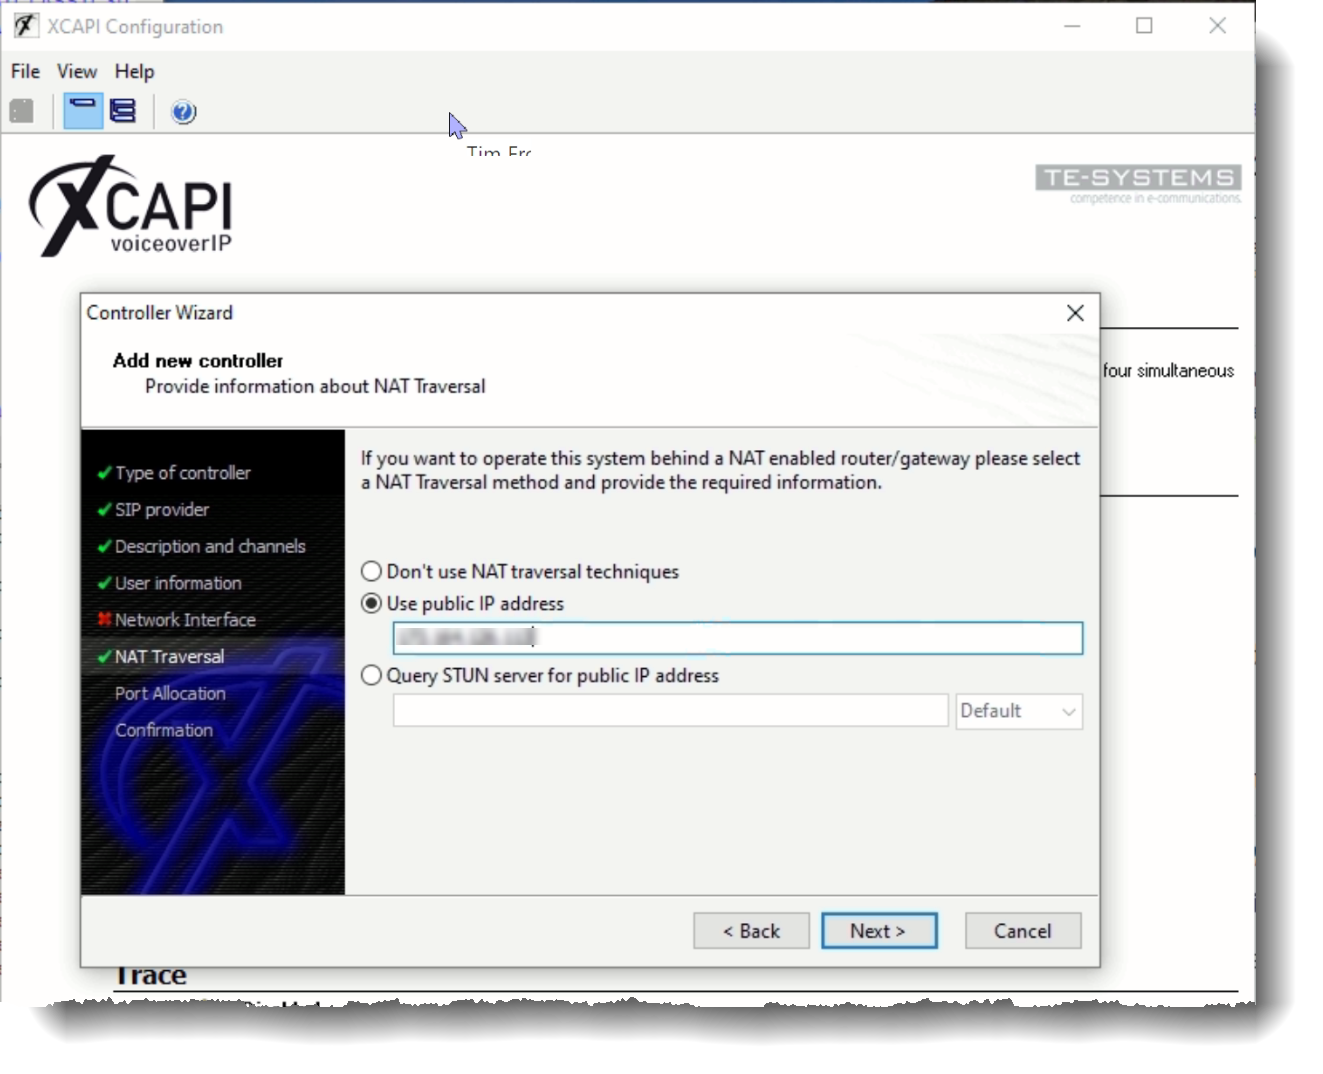
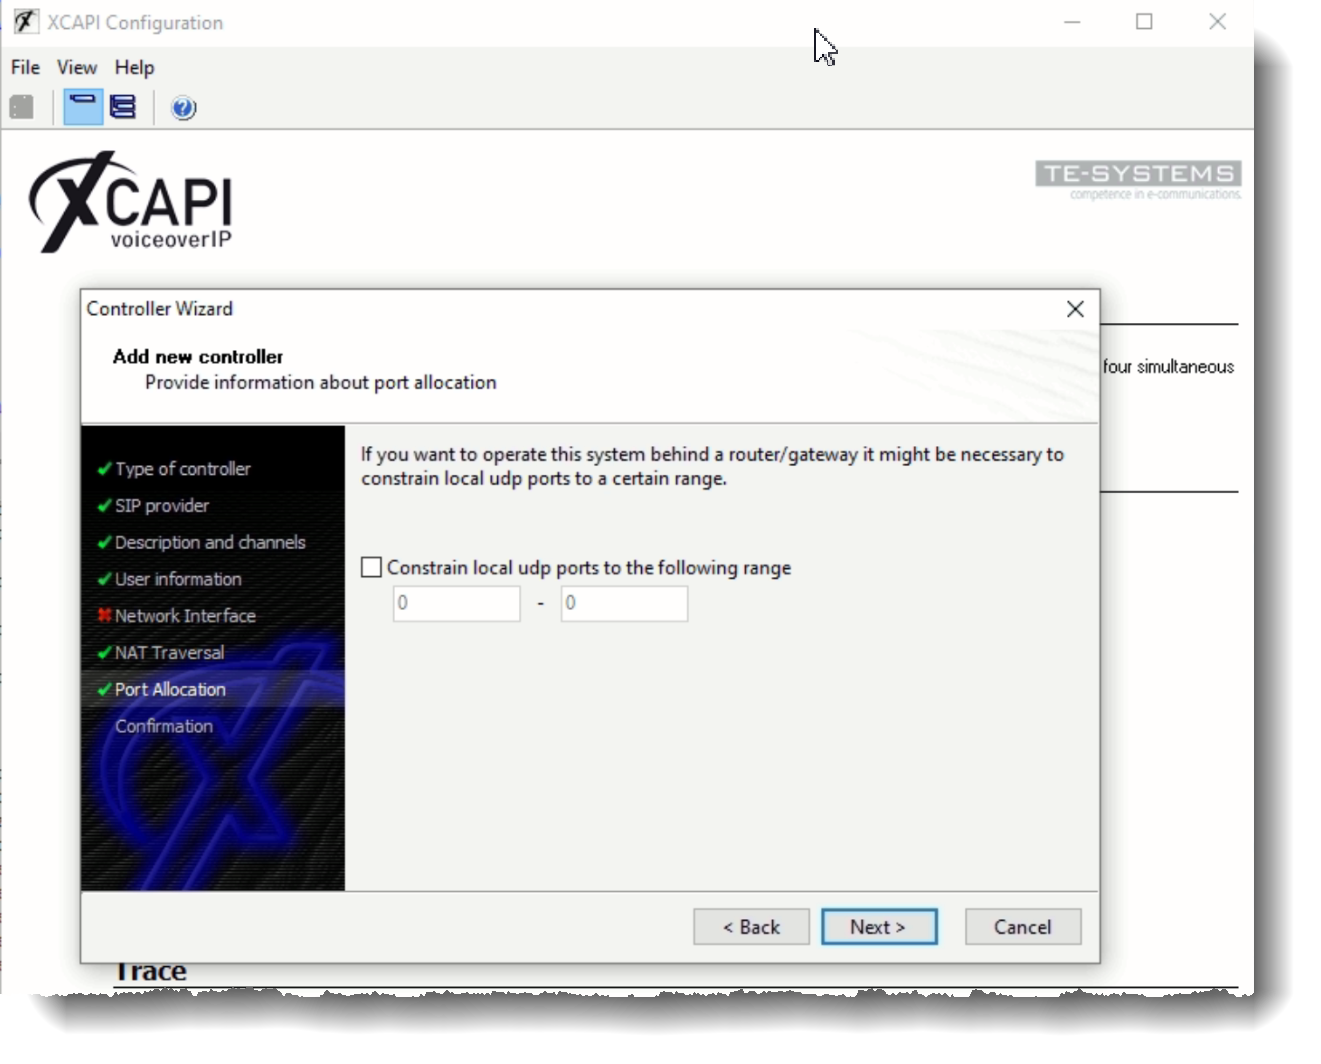
Normally the default for port constraints can be used:
| For Cloudli, be sure to set the SIP Registration and Proxy settings from your account SIP settings as described (with screen shots) in the Cloudli topic. |
Then, the summary screen for the SIP provider (Controller) should show:
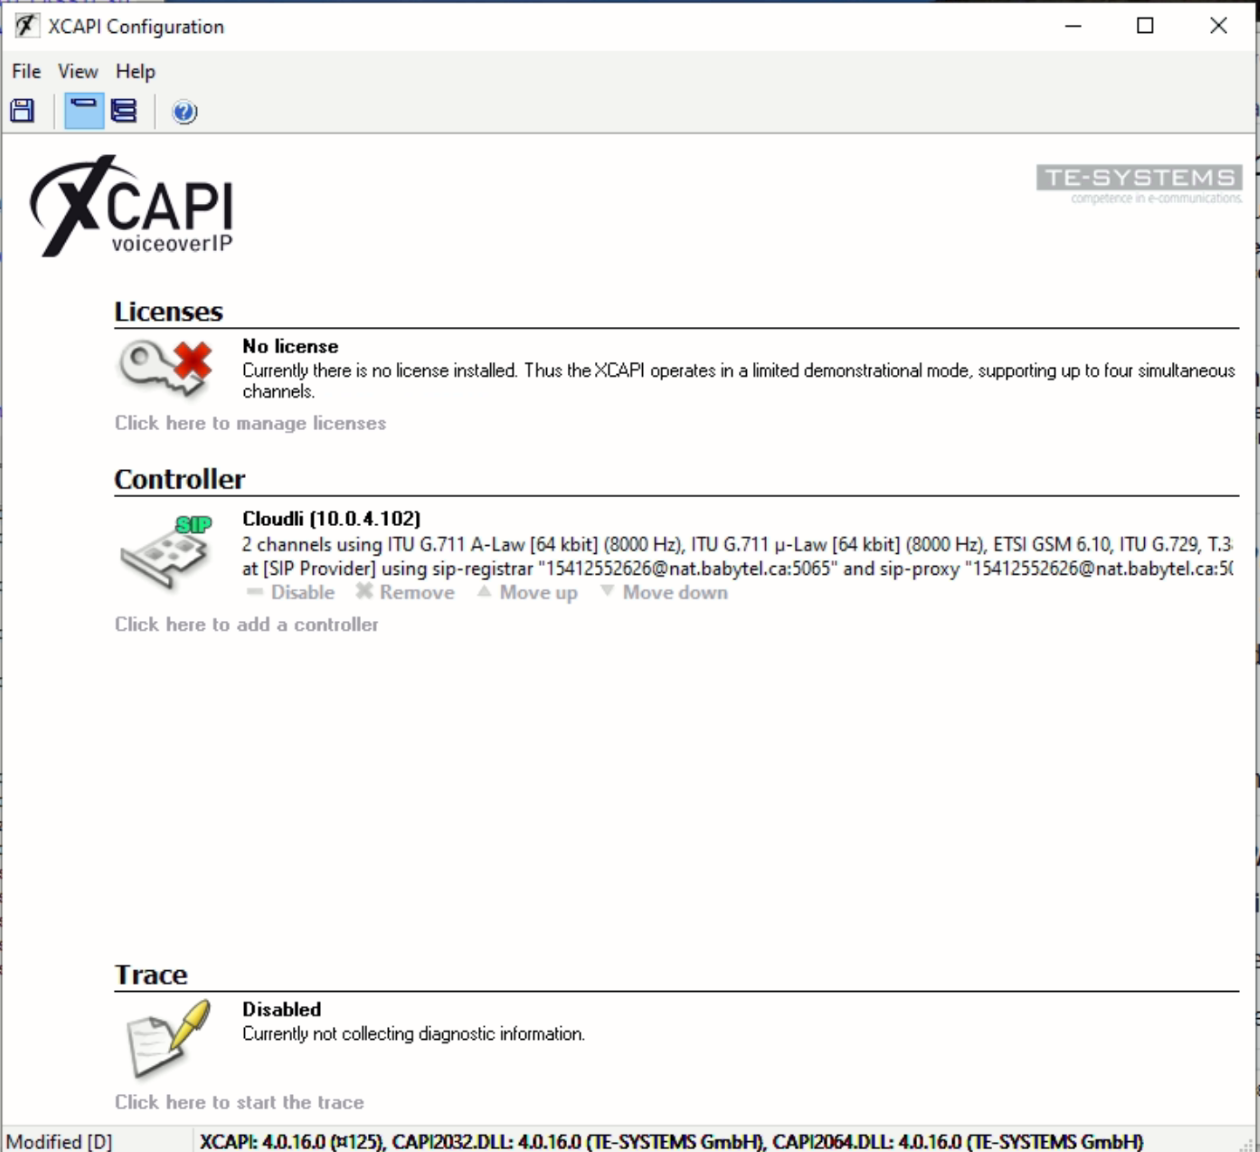
Next, Follow the steps in the XCAPI Trace Files subtopic to configure XCAPI tracing. This will be needed to resolve with TE Systems any questions that arise in the operation of XCAPI.
Site-specific Options
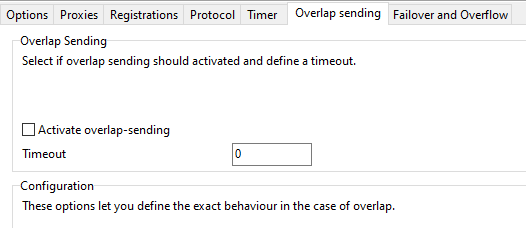
On the SIP page for your controller, we recommend unchecking the Activate overlap-sending checkbox. This improves the accuracy of the reporting of dialing failure outcomes such as invalid numbers.
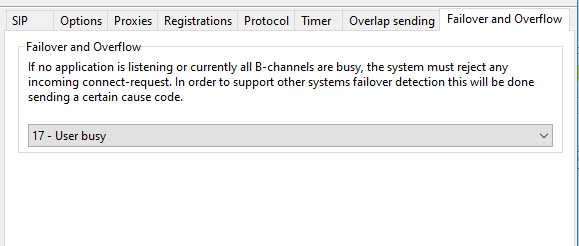
If your system handles a large number of incoming calls, some calls may need to be rejected if there are no free channels available. The reject cause defaults to 34 and is specified on the Failover and Overflow tab. The code 34 means 'no circuit or channel available and often results in an immediate retry by your SIP provider, without notification to the originator. To spread the incoming load, you may prefer to select code 17 (user busy) instead, which will usually be reported back to the originator for retry. The code numbers are Q.850 codes (table 1 in the PDF downloadable from https://www.itu.int/rec/T-REC-Q.850-201810-I/en) which map to SIP response codes as defined in RFC4497 (https://www.rfc-editor.org/rfc/rfc4497.html#page-29). The code 17 therefore results in a SIP response of 486 (user busy).
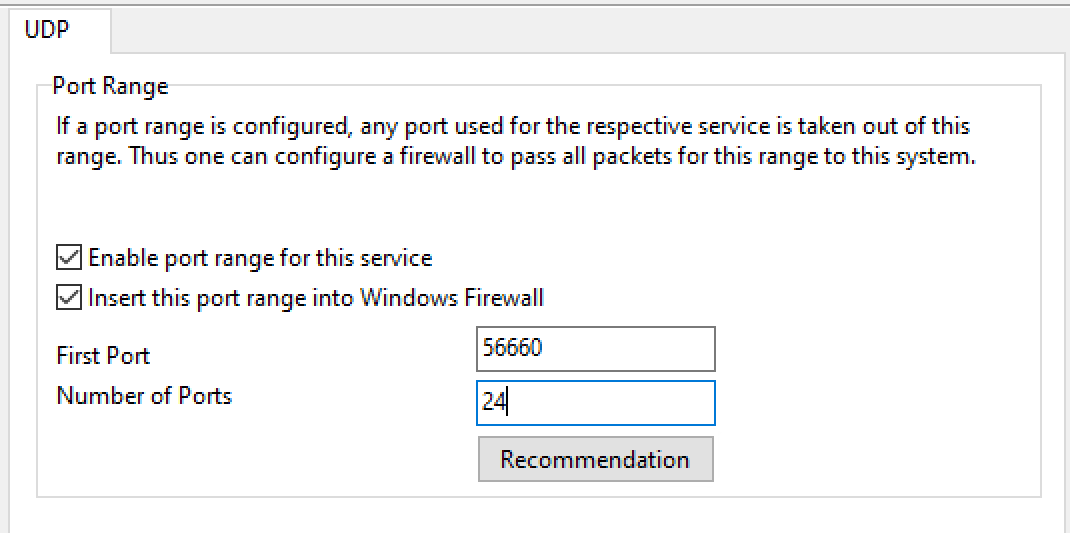
On the Network/Port Allocation page for the controller, it is recommended that you choose a port range of 24 ports, starting for example from 56660, or any unused range for your system. Then enable this range in your firewall, for both TCP and UDP, along with the SIP port (normally 5060). If you allow XCAPI to choose a range at each startup, it can lead to unexpected intermittent problems in the future if it chooses a range that collides with another service. The port range is set in the configurator on the Port Allocation page. If you allow XCAPI to choose a range at each startup, it can lead to unexpected intermittent problems in the future if it chooses a range that collides with another service.
Before testing XCAPI, it is strongly recommended to visit the Fax section in the expert view of the configurator, and usually to select "T.38 with fallback". The only reason to select "T.38" instead would be if your SIP provider or PBX handles T.38 conversions and offers only a T.38 interface to your system; or Softfax only if your SIP provider or PBX does not support T.38. If the connected party does not support T.38 and only T.38 is selected, then error outcome 8716 may be the result. When you select "T.38 with fallback" it is usually best to select "after" for CED and CNG tones below this selection, though this can depend on the remote party also.
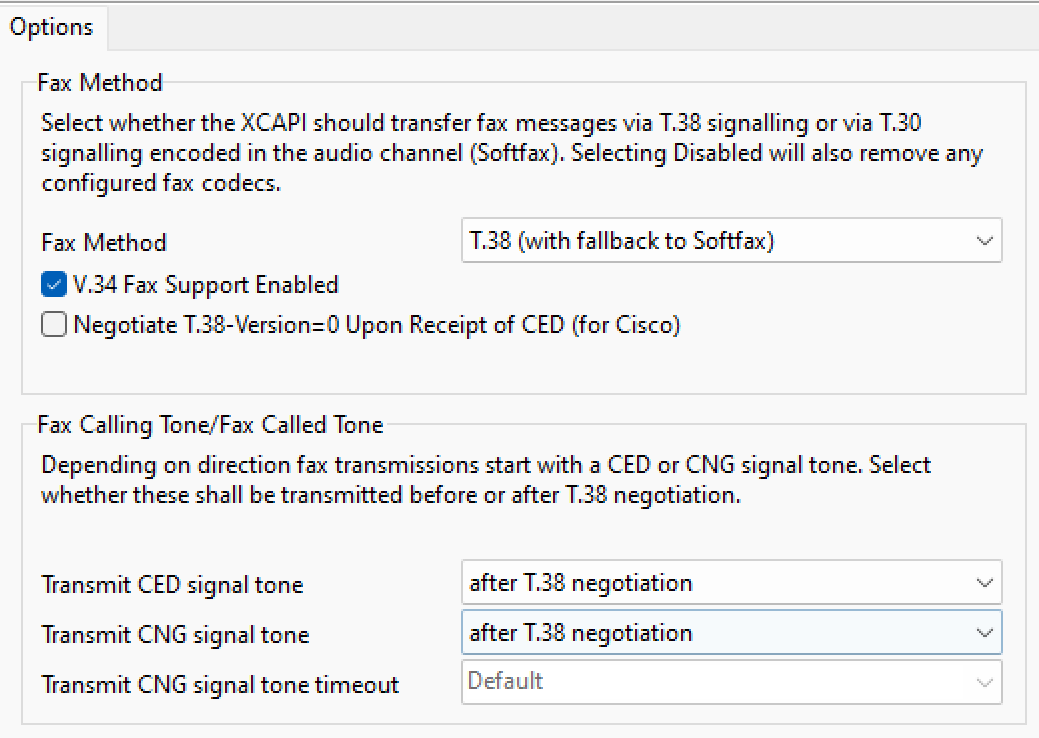
The other option selections on this screen may require adjustment depending on how your SIP provider or PBX is configured for T.38. These options may be set differently for different supported providers.
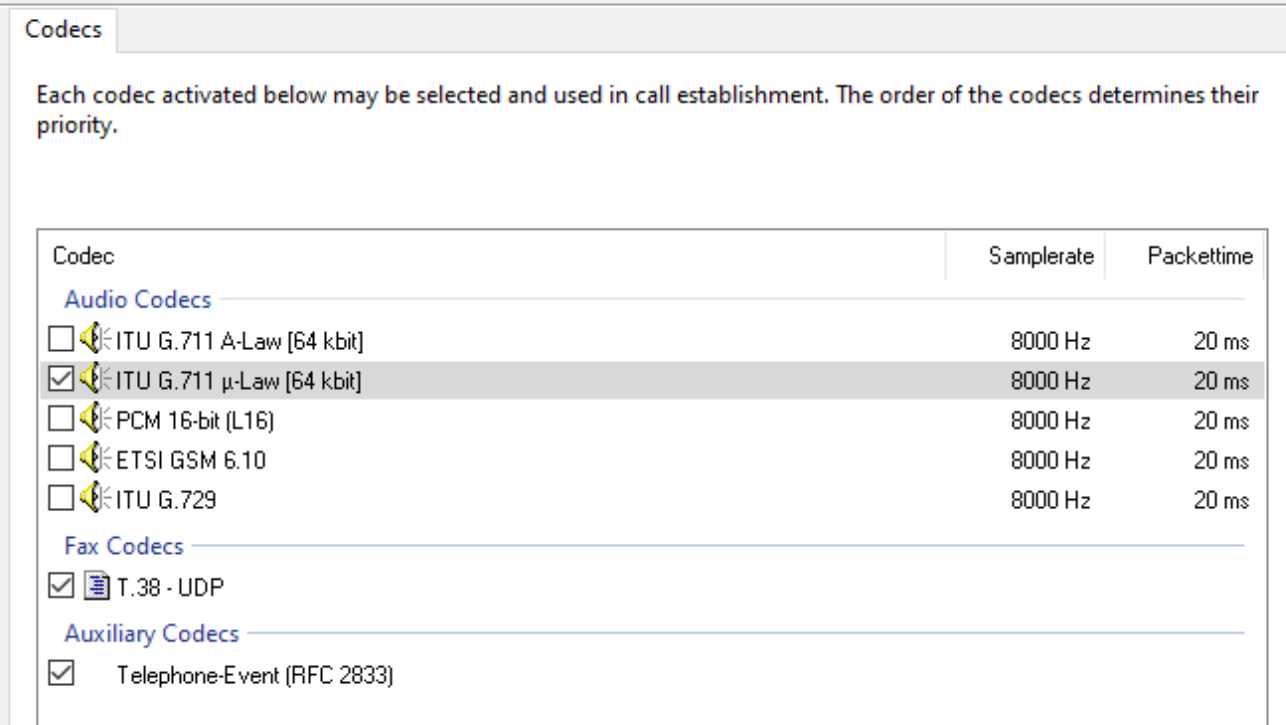
For connections to a Cisco PBX, and perhaps others, it is also important to allow XCAPI to use only the audio Codecs supported but the PBX for your region for XCAPI 'softfax' calls without T.38. Failure to limit the available codecs can result in failures, often with outcome 8717. The codecs can be selected on the configurator Codecs screen: normally only G.711 is needed, Mu-Law for North America and Japan, A-Law for elsewhere:
Testing XCAPI Settings
| Before starting COPIAFACTS with XCAPI, use the XTEST program supplied by TE-Systems to check that you can send and receive a test fax. |
If you are unable to send and receive with XTEST, please enable the XCAPI trace as shown above and re-test; an XCT trace file is almost always needed to resolve such issues.
CopiaFacts XCAPI control variables and CFG commands
If you use a default calling number for outbound calls, this must be specified in one of: the channel-range definitions in CFHWL; as OB_ANI in FAXFACTS.CFG; or as $outbound_ani in applicable user profile files.
| To work around a timing issue in XCAPI which may affect some sites, resulting in an error outcome 8726, we recommend always setting XCAPI_COMBINE_FAXFILES to a non-empty value in FAXFACTS.CFG. See also the XCAPI SDK Upgrade Notes below. |
If you expect to send and receive complex fax documents with many pages, you should consider overriding the default overall receive timeout and per-page send timeouts using the configuration file variables XCAPI_RECEIVE_TIMEOUT_MINUTES and XCAPI_PAGE_SEND_TIMEOUT_SECONDS.
Other variables documented in the topic for 'X' configuration-file variables and 'X' environment variables may also be relevant to your operations. We recommend checking these variables for new XCAPI installations. Examples of the variable syntax are provided in the 'X' topics linked.
When converting to XCAPI from another CopiaFacts board/port interface, your $fax_header commands may need to be changed if they incorporate board/port specific header-line syntax. In a system with a mix of boards/ports, you can use the FAX_HEADER_EN variable to specify an override header format for XCAPI.
Additional settings for Cloudli CryptAgent
See the separate subtopic for configuring CryptAgent with XCAPI.
In May 2025 TE-Systems pre-released an upgraded version (SDK build 4.1.0.1322) of XCSDK.DLL to fix an occasional timing issue when multiple documents ($fax_filename) were included in the same transmission, particularly when a small cover sheet was followed by large multi-page documents. Prior to this, Copia recommended using XCAPI_COMBINE_FAXFILES to concatenate all the files into one TIF file before passing this to XCAPI. TE-Systems tell us that this upgraded DLL will be included in a future XCAPI installer build, but this is not the case as at August 2025.
You can now install this upgrade by running COPIAINSTALL9 and selecting 'Check for Updates'. Then pick InstallXCAPISDK_DLL_1322.exe and download (to the COPIA\NETBIN folder). Run this installer to install the DLL into the Program Files (x86)\Copia folder for use by COPIAFACTS.
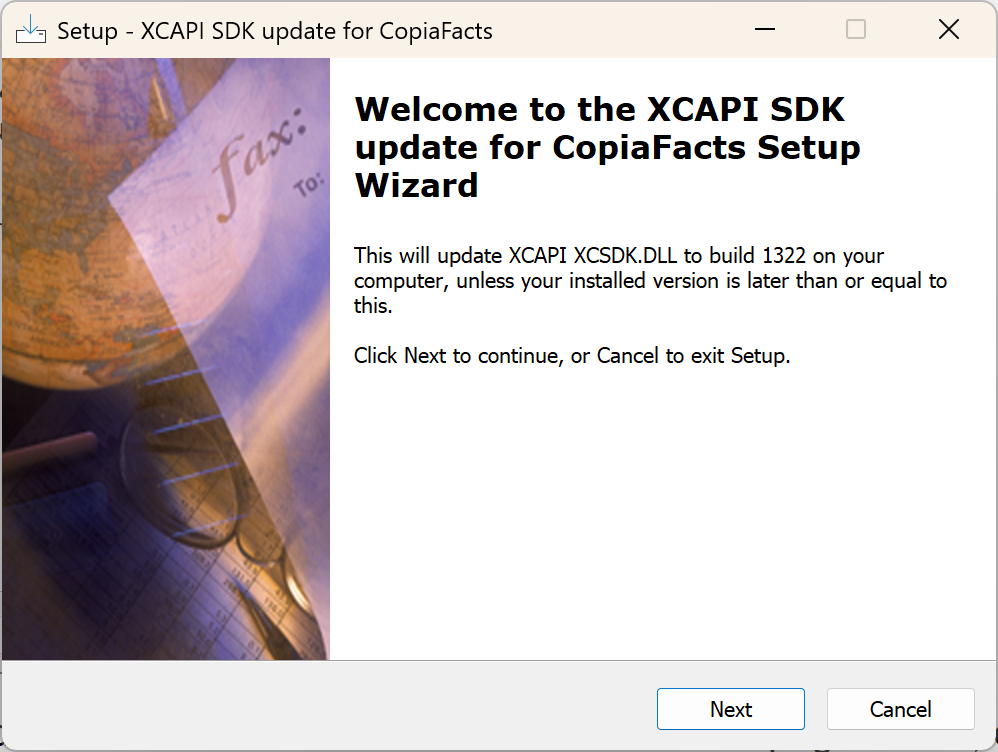
We recommend this upgrade for users who send fax documents with dozens or hundreds of pages each, especially with multiple concurrent transmissions. After upgrading you should be able to remove or comment-out XCAPI_COMBINE_FAXFILES and XCAPI_USE_TIFCAT from your configuration.
| You must shut down COPIAFACTS, and any XCAPI desktop programs, before running this installer. |
You should make some test transmissions with multiple documents after doing this. The time and resources saved by this change should noticeably improve COPIAFACTS overall throughput.
Installing this SDK upgrade does not have implications for your XCAPI License-on-Demand (LoD) expiration date, as would a full new XCAPI version which includes this updated DLL, when released.